If the release path is not written down, the tool has no job yet. A tight edge can be a spring side, a fixed track, a flexible frame, a painted joint or simply the wrong side of the opening. Sliding a thinner object into that gap does not identify which one it is.
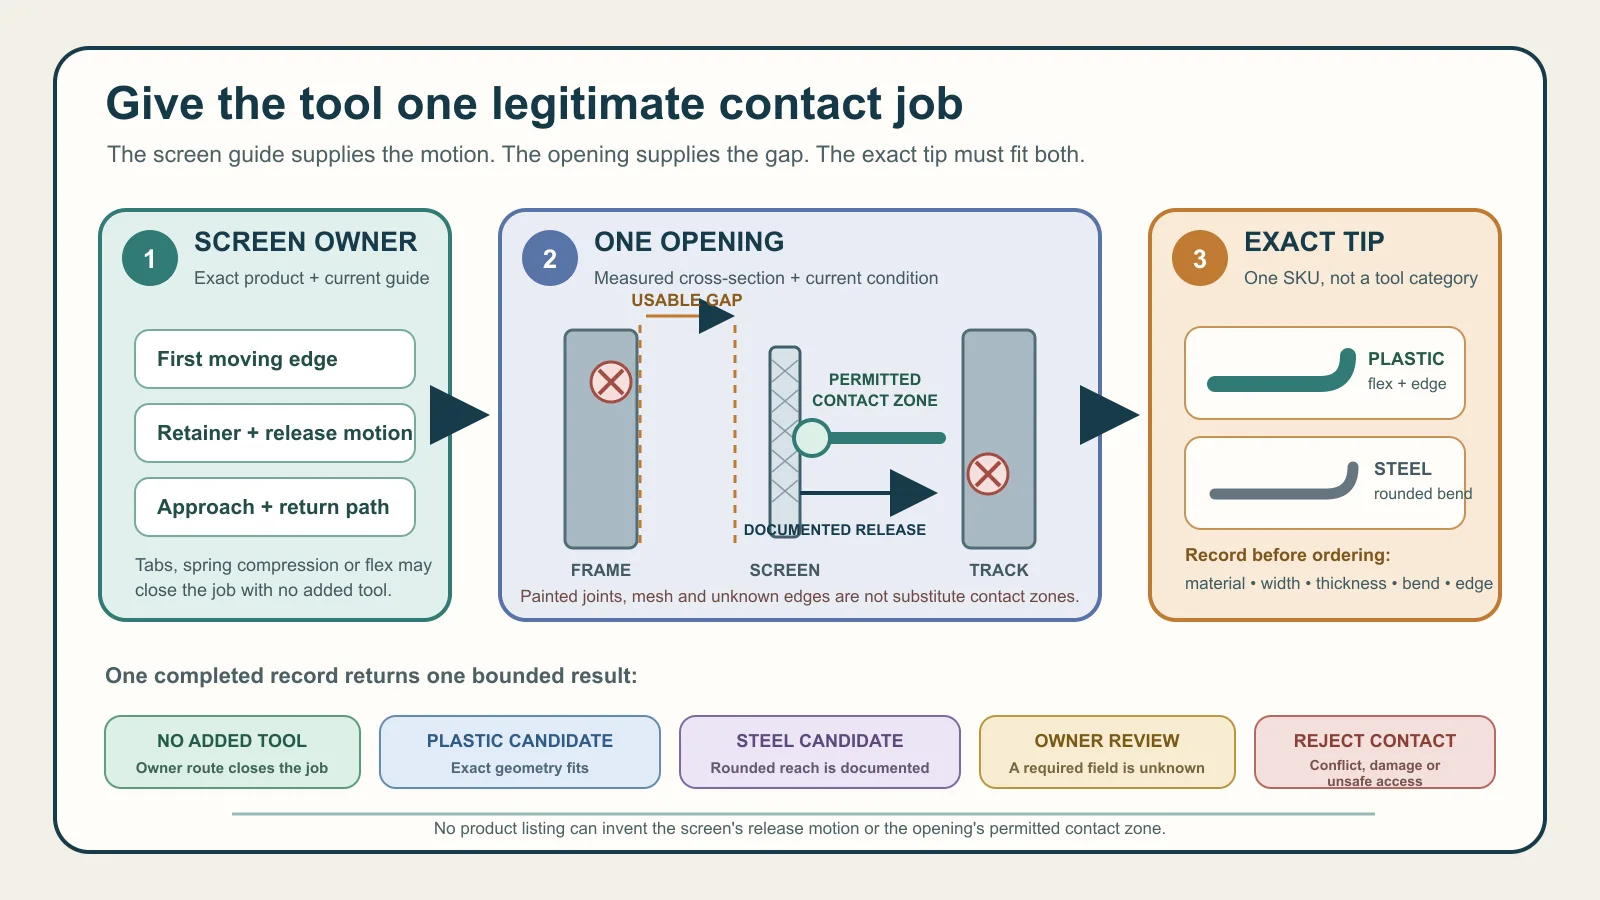
Start with the exact window and screen guide. Mark the approach side, retainer, first moving edge and return path. If that guide uses tabs, hand pressure or intentional frame flex without a pry tool, the correct purchase for that opening is no added tool. Only a documented contact zone turns a plastic profile or rounded steel bend into a candidate.
The purchase record therefore has three owners: the screen maker owns the movement, the actual opening owns the usable gap and current condition, and the tool page owns only the exact product facts it publishes. None of those layers can fill in another layer’s blank.
No release path, no tool job
Current screen instructions make the no-tool route real, not theoretical. Andersen’s current removal and storage page sends the user to the installation guide for the exact insect screen instead of publishing one movement for the whole brand. That is a useful ceiling: a tool listing cannot supply the missing product guide.
Milgard’s one-page care sheet identifies a compression spring, frame, mesh and screen tabs. Its listed materials are safety glasses and gloves. For the screen covered by that sheet, the removal motion is to press up on the top while lifting the tabs; the return path slides the screen into the groove while the top is pressed again. No pry step is published.
Champion publishes another hand-operated route for its named full and half rigid screens. The screen is raised, grasped at the top and bottom, then moved toward the side containing the spring so the opposite edge can clear its track. The same guide warns that screens are not safety barriers. That warning matters before any exterior or elevated approach is considered.
| Owner evidence | What it establishes | Tool implication |
|---|---|---|
| Andersen general support | The matching installation guide owns removal | Hold tool contact until the exact guide is located |
| Milgard named care sheet | Top compression and tab lift for the covered screen | No added pry tool appears in the published movement |
| Champion named rigid-screen guide | Side-spring compression clears the opposite track | First identify the spring side and safe approach |
| Champion FlexScreen guide | Intentional frame flex belongs to the named flexible product | Never import a rigid-frame pry method into this route |
The screen-removal guide turns manufacturer instructions into a movement map. Use that map first. This page begins one step later: it decides whether a separate tool deserves an order line after the movement is known.
Plastic and steel are different records, not a ranking
WindowCleaner.com identifies the NICE Screen Removal Tool as SKU 265-60-02 and describes durable plastic with a narrow handle. The seller presents it as a way to get behind a screen frame from the exterior and pry the frame out. That is a declared product use, not permission from the selected screen owner.
ScreenPop, specialist SKU 352-60-01, is also described as durable plastic. Its page adds a second job: pairing the tool with a towel for track cleaning. The current cart was sold out when observed, but stock is too volatile to decide whether the shape fits an opening.
J. Racenstein’s current Screen King page describes a steel tool with a plastic handle and a smooth round bend intended for tight areas. It also lists flat-head screwdriver, scraper, bottle-opener and spline-insertion functions. Those extras may affect kit value after removal fit passes; they do not expand the tool’s contact permission.
Windows101 supplies a fourth exact identity, W112, and calls it a compact screen-removal helper. The opened product copy does not state its material or dimensions. A product can therefore be easy to identify in a cart and still be impossible to fit from published data alone.
| Exact current cart | Published construction or shape | Important field still open |
|---|---|---|
| NICE 265-60-02 | Plastic; narrow handle | Tip thickness, width, bend, edge finish and exact contact scope |
| ScreenPop 352-60-01 | Plastic; lightweight removal and track-cleaning profile | Complete dimensions and screen-owner permission |
| Screen King 55-207 | Steel with plastic handle; smooth round bend | Complete tip dimensions and fit to the selected gap |
| Windows101 W112 | Compact removal role | Material, geometry, dimensions and contact scope |
Plastic is not automatically safe, and steel is not automatically wrong. A plastic edge can still be too thick, sharp from wear or aimed at mesh. A rounded steel bend can still reach the wrong retainer or contact a coated finish. Material starts a record; it does not finish one.
The missing dimension can stop the order
The visible gap is merely the entrance. The permitted contact zone is the place the screen guide or owner allows the tool to influence. Those can be on different planes. A tip may enter beside the frame yet miss the moving edge, bottom out on the track or bear against mesh before it reaches the intended point.
None of the four product pages opened for this article published a complete set of tip thickness, tip width, bend or radius and overall dimensions. Words such as narrow, compact and tight-space do not close that gap. If one of those measurements changes whether the tool can enter and turn without touching a protected surface, obtain the exact drawing or measurement from the product owner or seller. A product photo is not a scale drawing.
| Fit owner | Record before purchase | Hold condition |
|---|---|---|
| Screen guide | Retainer, release direction, first moving edge and return path | The movement is missing or belongs to another product line |
| Actual opening | Approach side, usable gap, permitted contact zone and existing damage | Access is unsafe, the contact zone is unknown or damage is already present |
| Exact tool | SKU, material, tip thickness/width, bend or radius and edge condition | A fit-changing dimension is unpublished or unmeasured |
| Reversible result | Expected movement, stop observation and successful return | Resistance, new damage or failed reinstallation appears |
Suppose a frame has a 3 mm visible gap. That number alone does not approve a 2 mm tip. The moving edge may sit deeper than the bend can reach, the tool may need room to rotate, or the visible slot may expose mesh rather than the frame member that is meant to move. The decision belongs to the complete contact path, not one favorable measurement.
Unexpected resistance is new evidence. Do not use it as a reason to move from plastic to steel, from rounded to sharp or from one side of the opening to another. Return to the screen identity and release map. A tool trial that needs a more aggressive second tool has not validated the first purchase decision.
A multi-tool does not get extra permission
ScreenPop’s track-cleaning role and Screen King’s scraper, screwdriver and spline functions are legitimate product distinctions. They are not permission to use every edge on the same window.
Track soil has its own surface, finish and moisture constraints. Spline insertion belongs to screen repair and requires the correct frame, spline and mesh record. A flat-head edge that can adjust a tool fastener may be unsuitable beside a finished frame. Even after a removal tip passes, rotate the tool to another function only when that second contact task has its own authority.
This also prevents a misleading value calculation. Five named functions do not make a product five times more useful if four are ineligible on the route. Compare only functions the crew can actually assign to documented tasks. Otherwise a simple exact-fit profile can be more useful than a feature-rich tool whose key geometry is unknown.
Put the result beside one opening and one SKU
Do not create a fleet-wide rule from one loose screen. Label the opening, exact screen or window line, controlling guide and selected SKU. Preserve photographs or measurements only when the property owner permits them, and record the current frame, mesh, retainer, track and finish condition before contact.
| Complete record shows | Purchase result |
|---|---|
| The owner route uses tabs, spring compression or intentional flex without an added tool | No added tool for that opening |
| A documented contact zone, measured gap and exact plastic geometry agree | Exact flexible-tool candidate, followed by one reversible observation |
| A documented contact zone requires a rounded reach and the exact steel geometry agrees | Exact rounded-steel candidate, followed by one reversible observation |
| The guide, approach, dimension, contact zone or return path is missing | Owner or service review before ordering or contact |
| The tool conflicts with the guide, access is unsafe, damage is present or resistance changes the plan | Reject tool contact for that opening |
After supported removal, hand the screen to the screen-cleaning method page rather than letting the removal tool choose the wash process. If route volume later justifies a dedicated machine, the XERO Screen Cleaner decision remains a separate equipment fit. For the rest of the paid-job setup, the professional window-cleaning tools pillar keeps this small accessory in context.
The order is ready only when one exact SKU has one documented contact job and one reversible result. An unassigned removal tool stays off the belt.