A pull tab is a handle, not a complete removal instruction. On one screen it works while the top edge is compressed. On another, the rigid frame moves toward a spring hidden along one side. On a flexible screen, the long sides are deliberately bowed inward. The correct motion for one product can bend or unseat another.
Before moving the frame, identify the window manufacturer and product line, the exact screen construction and the current removal guide. Write down the retainer, the direction that compresses or flexes, the edge that clears its track first and the path the screen takes through the opening. If the guide does not close those fields, leave the screen installed.
Do not use a screen as a fall barrier, and do not turn an exterior or upper-story access problem into a removal experiment. This page supplies no ladder, lean-out or outside-reach procedure. When the exact guide cannot be followed from the available safe position, the next call belongs to the window owner or service provider.
Screen removal is a small preparation task inside a professional window-cleaning tool setup. It should preserve the window and screen for the work that follows, not create an unexpected repair.
Name the retainer before you move the frame
Start with the product label, order record, owner manual or manufacturer support path. Window style—hung, sliding, casement or awning—narrows the search, but it does not identify the screen attachment by itself. Product lines within one brand can use different screens, and a replacement screen may not match the original construction.
Look at the whole perimeter without pulling. A tab shows where a hand may grip; it does not prove which edge releases. A visible spring suggests a compression side only when the matching guide says so. A track shows where the frame is seated, not which corner should leave it first.
| What you see | What it may help identify | What still has to come from the guide |
|---|---|---|
| One or two pull tabs | A grip location | Compression direction, clearing edge and whether tabs release anything |
| Spring or bowed metal along one edge | A possible compression side | Which way the frame moves and which opposite edge exits |
| Top, bottom or side tracks | Where the frame is seated | First released corner, lift amount and path through the opening |
| A perimeter designed to flex | A named flexible-screen construction | Permitted flex direction and amount; never assume a rigid frame may flex |
| Cassette, cords, damaged latch or loose mesh | Retractable, specialty or repair-dependent screen | Whether removal belongs to normal care at all |
If the screen cannot be matched to a current document, take its dimensions and identifying marks to the manufacturer or parts/service owner. A generic search for “screen with two tabs” is not enough to distinguish a compatible replacement, a release method or an approach side.
Write the movement before you make it
A useful removal plan is short enough to fit on one job note. Its purpose is not paperwork; it is to make the first move and the return move visible before the frame is carrying any load.
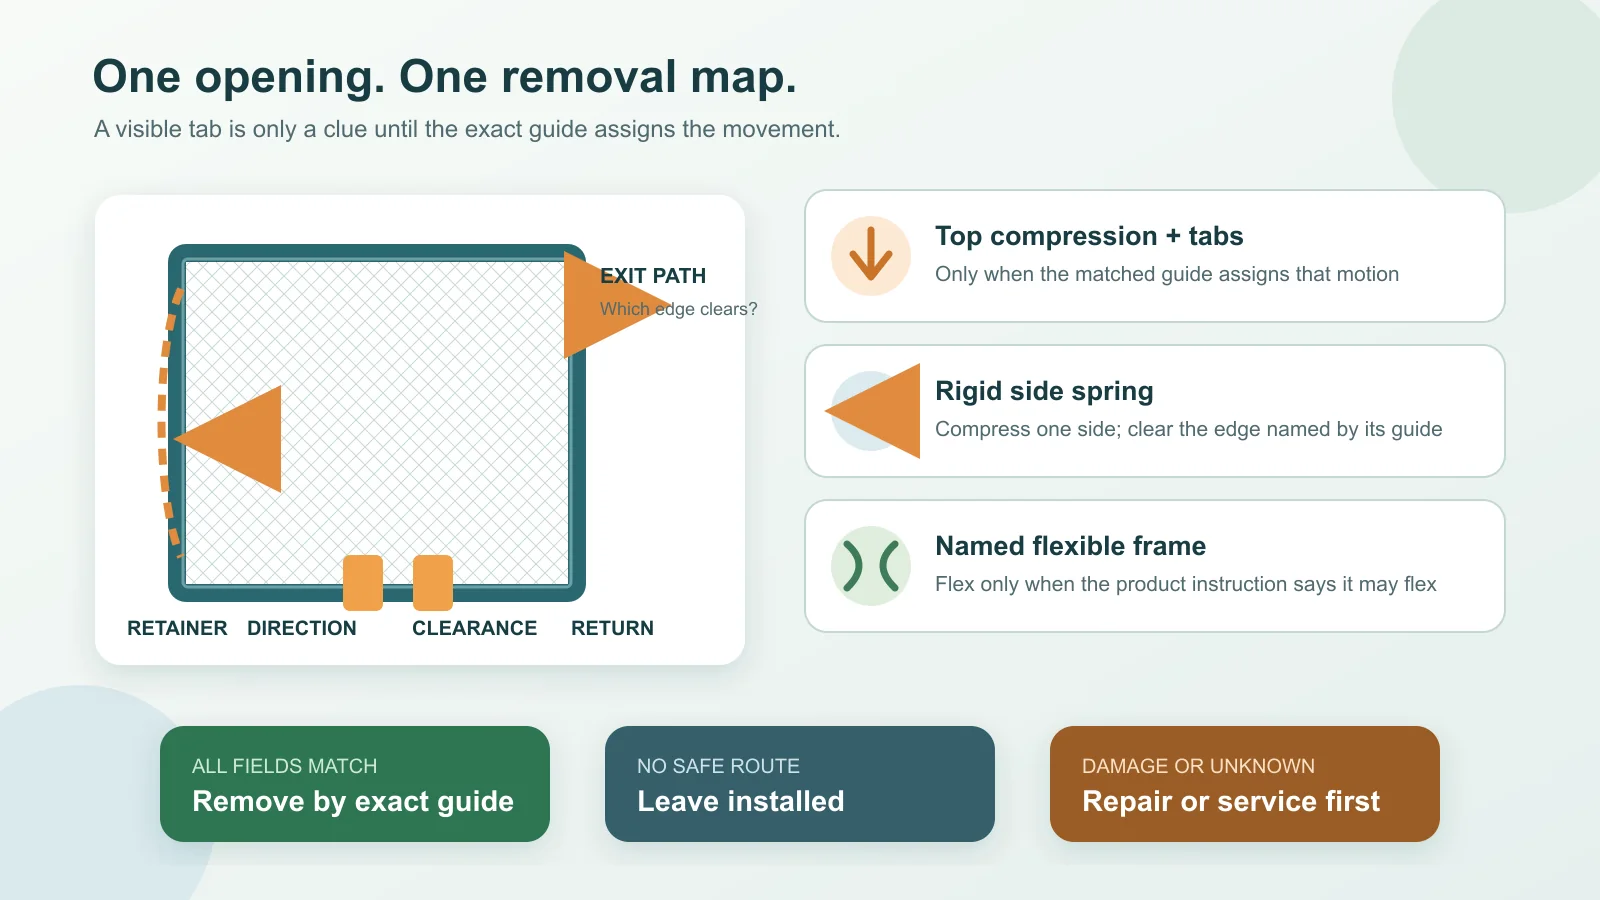
| Field | Ready entry | If it is missing |
|---|---|---|
| Opening identity | Room/elevation, window line, screen construction and orientation | Do not combine it with other removed screens |
| Instruction owner | Manufacturer, exact guide and visible revision/version when supplied | Return to product identification |
| Approach | The side and opening position named by that guide | Do not invent inside/outside access |
| Retainer | Exact spring, tab, latch, track or flexible-frame role | A visible handle cannot fill it |
| Release motion | First moving edge plus compression, lift or permitted flex direction | No pulling or prying |
| Exit path | Edge/corner that clears and route through the exact opening | Keep the frame seated |
| Return proof | Reinstallation order and the guide’s seated-track/retainer result | Removal is not yet reversible |
Use a separate line for damage. A bent frame, torn or loose mesh, missing tab, corroded spring, painted joint or binding retractable mechanism is not repaired by completing the other fields. It changes the result to service first.
Current guides describe three different motions
Manufacturer instructions are useful here because they show exactly why a universal “pull the tabs” sequence fails.
The current Andersen removal and storage page does not publish one motion for every Andersen insect screen. It directs the owner to the applicable installation guide. That is a meaningful answer: identify the exact screen before borrowing a sequence from a different series.
| Exact current guide | Retainer and removal motion | Return path | Do not transfer |
|---|---|---|---|
| Milgard window-screen care sheet | Press up on the top while lifting the screen tabs, then remove | Slide into the groove while lifting tabs and pressing the top | Top-compression sequence to an unidentified screen |
| Champion rigid full/half screen | Raise a few inches, grasp top and bottom, then push toward the side spring so the opposite edge clears its track | Spring side enters one side track, compresses into the opposite track, then lowers into the bottom track | Side-spring movement to a flexible frame |
| Champion FlexScreen guide 0720 | Press the middle so the sides flex inward; lift bottom corners from the track and keep the sides compressed through the opening | Flex the long sides inward 4–6 inches, feed through, place bottom then top corners and release the sides into their tracks | Intentional flex or its numeric amount to a rigid screen |
These are not three options for the same screen. Each row is evidence for one named construction. If your screen does not match the row’s manufacturer/product guide, the row teaches only that attachment systems differ.
Resistance means the map is incomplete
The first unexpected motion is a reason to pause. It may mean a second retainer is still engaged, the wrong side is being compressed, the screen is not designed to leave from that side, or the frame already has damage. More force cannot tell those cases apart.
| What happens | Working result | Next move |
|---|---|---|
| One edge moves but another remains locked | A retainer or exit field is still open | Reseat the frame without adding force and re-read the exact guide |
| A supposedly rigid frame begins to bow | Stop the removal | Confirm the construction; do not treat FlexScreen instructions as generic |
| A joint appears painted, sealed or mechanically blocked | Property or product service is required | Do not use this page to cut, pry or lubricate the joint |
| Tab, spring, mesh or frame is damaged | Repair/service first | Identify the exact part and screen owner before further handling |
| The guide requires access that is not available from a safe working position | Leave installed | Use the product owner or an appropriately equipped service provider |
Some generic pages suggest slipping a screwdriver or putty knife under an unknown edge. That advice is not carried into this guide. If an exact manufacturer procedure names a tool, its contact point and use remain part of that exact procedure; otherwise, a tool cannot reveal which retainer is still loaded.
The return path belongs to the removal plan
Before the screen leaves its opening, give the opening a durable identity and preserve orientation when it affects reinstallation. Keep the screen tied to that record throughout cleaning or storage. Do not make a stack of similar frames and plan to identify them by size afterward.
Handle and support the frame as its owner directs rather than lifting by the mesh. Andersen’s current storage guidance allows a screen to lie flat or stand upright when it is fully supported; the storage area should be dry and ventilated, with no pressure on the mesh or frame and nothing positioned to fall on it.
Once removal is closed, the separate window-screen cleaning decision chooses in-place care, supported hand washing, a dedicated washer or repair/replacement. That page owns water, brush, drying and machine questions. A successful removal does not authorize every cleaning method.
| Result | What makes it supportable | Handoff |
|---|---|---|
| Remove by the exact guide | Product, retainer, release, exit and return path match; frame/mesh are sound; access is suitable | Label the opening/orientation, support the frame, then choose its cleaning method |
| Leave installed | The product is fixed/retractable within its care path, or exact/safe removal access is not available | Use only the owner’s permitted in-place care or service route |
| Repair or service first | Identity, retainer or return path is missing, or damage/binding changes the movement | Return to the window/screen owner with the exact opening record |
The screen is ready to leave the opening only when the instruction, the frame’s movement and the route back all agree. If one of those is missing, the correct removal step is no movement.