Put the squeegee or washer you plan to use on the table. If you cannot name the part that connects it to the pole, a longer reach number is irrelevant. You may be looking at a pole, a separate tip and an adapter—not one product whose pieces automatically fit.
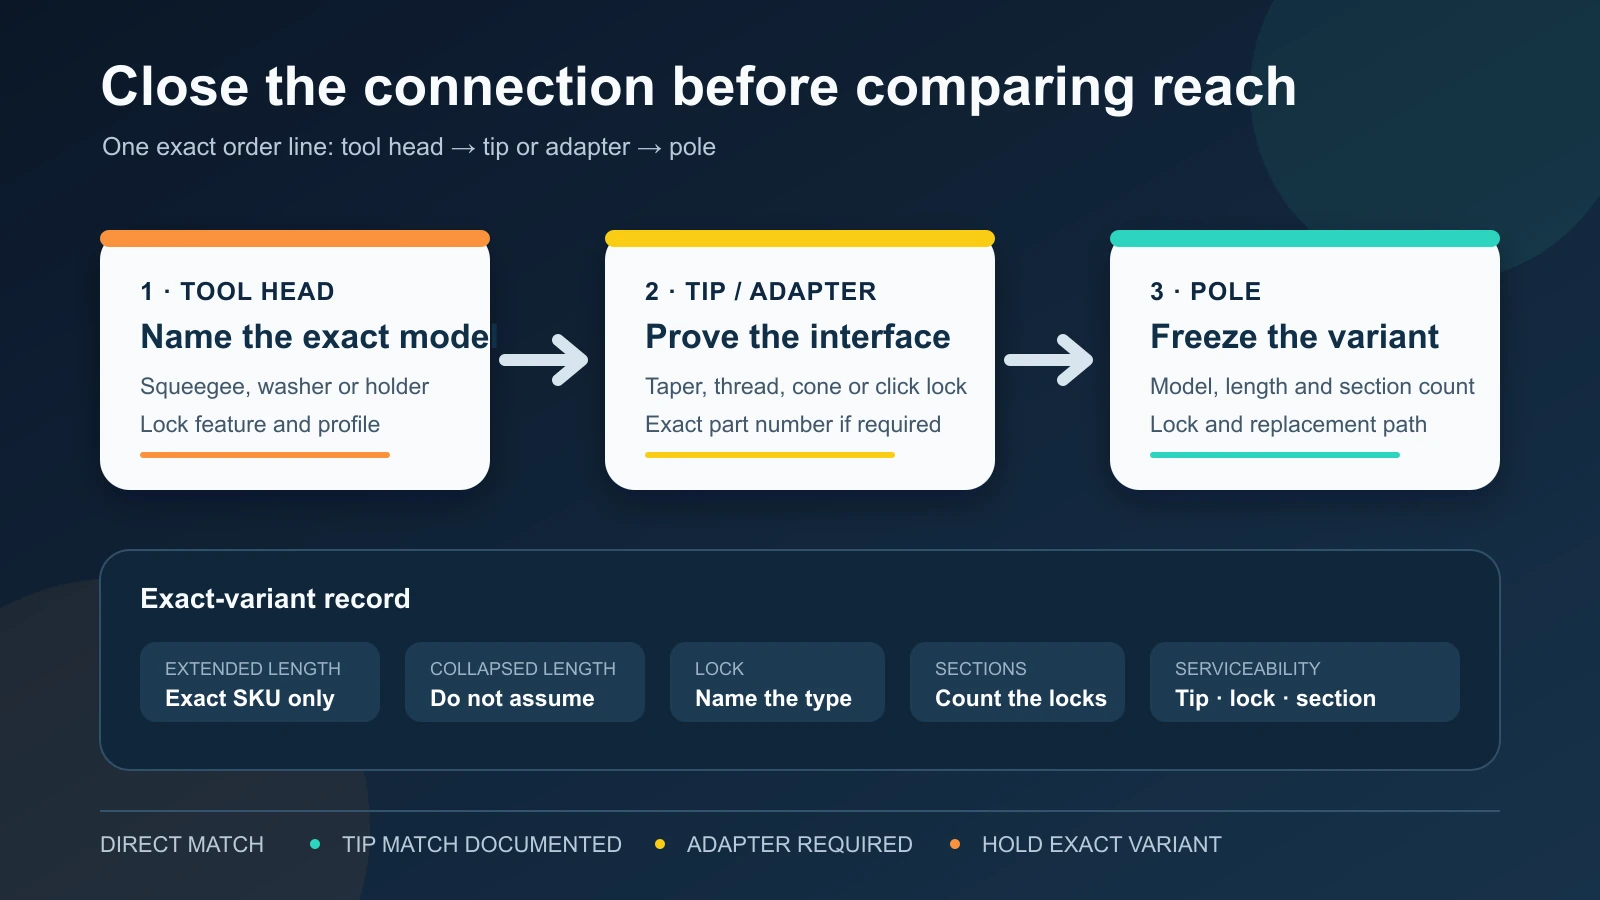
That is the useful buying order for a window cleaning extension pole: exact tool head first, tip or adapter second, exact pole variant third. Then record the variant’s extended length, collapsed length, lock, number of sections and documented replacement path. A blank connection does not become compatible because two pages use words such as “universal,” “tapered” or “professional.”
If the open question is whether a traditional pole is the right method at all, settle that in the ground-based options for high windows before opening product tabs. This page begins after the traditional washer-and-squeegee path has been chosen.
Put the tool head on the table
The tool head supplies the first specification. Write its manufacturer, model, size where relevant, connection profile and any locking feature it expects. “My squeegee” is not an identifier. Neither is a photograph of a cone-shaped end.
A friction fit and a positive lock answer different questions. A tapered tip may physically enter a handle without engaging the button, collar or cone system that the manufacturer documents. A thread description is equally incomplete unless the thread and the receiving part are both identified. When the seller names only a category, record the category—but leave the exact fit open.
Use this sentence before comparing poles:
I need to connect [exact tool head] to [exact pole] through [exact tip or adapter], and the manufacturer documents [the interface or locking action].
If you cannot complete the sentence, you do not yet have a ready cart. You have a fit question.
This narrower purchase also belongs inside the broader professional window-cleaning tool setup. The job decides which head is needed; the head then controls the connection. Reversing that sequence is how a pole collection grows while the useful tool still lives in the vehicle.
Draw the connection as three parts
Treat the connection as two joins, not one vague claim:
- Tool head → tip or adapter. The exact washer, squeegee or holder must have a documented path to the chosen tip.
- Tip or adapter → pole. The tip must be supplied with, or explicitly fit, the exact pole family and variant you are ordering.
The middle part matters because it can change the result. A replacement tip may add a thread, taper or locking button the bare pole does not provide. An adapter can bridge two documented interfaces. But a part sold in the same category is not evidence of a bridge.
Complete one row for the cart you are actually considering:
| Record field | What to enter | Evidence that closes it | If it is missing |
|---|---|---|---|
| Tool head | Brand, model, type and size | Current manufacturer page or manual for that exact head | Hold the connection |
| Head interface | Cone, taper, thread, click button, collar or other declared feature | Wording or diagram tied to the exact model | Do not identify it from appearance alone |
| Tip or adapter | Exact name and part number | Current product or support page | Do not substitute a generic category |
| Pole | Brand, family, model and ordered variant | Current manufacturer product page | Hold the variant |
| Pole-side interface | How the tip joins the pole | Same-system documentation for the named parts | Hold cross-brand or mixed-family fit |
| Locking action | What retains the tool head | Manufacturer-declared lock for the selected combination | Treat a friction-only assumption as unresolved |
| Connection result | One of the four results below | Every preceding field agrees | Use HOLD_EXACT_VARIANT |
The page’s diagram compresses the same record into a visual chain. It is not a compatibility chart. Its purpose is to show exactly where evidence must exist—and where an adapter or unresolved part number changes the order.
Reach is two product numbers, not a promise
After the connection closes, compare the exact variant’s extended length and collapsed length. Both belong on the same record.
Extended length describes the product, not a guaranteed working height. Some pages add a person’s assumed height to make a larger “reach” claim. That can be useful marketing shorthand, but it is not the pole’s physical length and it does not establish safe access for a job. Keep the manufacturer’s product dimension separate from body height, technique and site conditions.
Collapsed length answers a different question: will the pole fit in the intended vehicle, storage area and route workflow? A family may be offered in several lengths with different section arrangements. The longest number on the family page cannot supply the collapsed dimension—or even the exact extended dimension—of the variant in your cart.
Write the units exactly as the source provides them. If a page gives only a family maximum, label it family maximum, not ordered-SKU length. If the collapsed value is absent, write UNKNOWN and ask for the current variant specification. Converting a missing field into an estimate defeats the reason for making the record.
Do not use this product-length step as a substitute for deciding working geometry. That separate question is covered for water-fed pole selection; a water-fed pole also carries hose, water delivery and brush-interface requirements that a traditional extension pole does not.
Every lock and section creates an owner
Telescoping sections add more than length. Each lock or clamp is a named mechanism that should have an operating instruction and, ideally, a documented part or service path. This is not a claim that one design is stronger. It is a way to see what you will own.
Record four things for the exact variant:
- the lock or clamp type;
- the number of telescoping sections;
- whether the manufacturer documents a replaceable tip, lock or section;
- the exact replacement part or support route, where one is published.
Silence is not the same as “non-replaceable.” It means the source reviewed did not close the field. Conflicting manufacturer pages are also not permission to choose the more convenient sentence. Keep both statements, freeze the model and ask which instruction applies to the current ordered variant.
This is especially important when a family name covers professional and standard constructions. A replacement method documented for one line may not transfer to another even when the poles share branding.
Current systems prove less than their names suggest
The current Ettore and Unger pages show how to use manufacturer evidence without turning it into a universal compatibility table.
| Current system evidence | What the manufacturer currently declares | What it closes | What remains open |
|---|---|---|---|
| Ettore REA-C-H product page | Aluminum construction, a quick open/close tapered clamp and a click-lock tip for compatible Ettore tools on the selected product page | Material, section-lock type and an in-system tool-lock path | Third-party tool fit, exact collapsed length and any unspecified variant detail |
| Ettore Pro+ Pole Tip #1700 | A dual tapered/threaded tip with a click-lock button for compatible Ettore tools, declared for professional REA-C-H poles | A documented professional-family tip option and its interface features | Automatic fit to standard REA-C-H variants or another brand’s head |
| Ettore support guidance | REA-C-H tip replacement methods differ between professional and standard poles | The need to freeze the family or variant before ordering a replacement | A simplified product-page statement about tip serviceability does not settle the exact cart; mark the conflict |
| Unger OptiLoc product page | ErgoTec locking cone and a two-component twist lock; the page presents a family with multiple length options | The declared pole-end system and lock type | Exact variant dimensions and third-party compatibility |
| Unger telescopic-pole family | The ErgoTec safety-cone system is presented for Unger window-cleaning tools | A same-system compatibility statement for named Unger tools | It does not turn every cone-shaped or threaded third-party tool into a documented match |
None of these rows names a winner. They demonstrate the amount of evidence needed for one field. Ettore’s click-lock wording can support an Ettore-system path without proving another handle. Unger’s safety-cone statement can support the tools the company names without becoming a generic cone standard. The replacement conflict is useful precisely because it prevents a false clean answer.
If your selected method sends water through the pole to a brush, stop here and move to the water-fed system path. A traditional extension pole can hold a washer or squeegee without owning the filtration, hose, flow and brush-connection decisions that define a water-fed pole system.
Write the cart line in full
Return to the sentence near the top, but add the exact variant fields:
Tool head: [manufacturer + model] → tip/adapter: [part number + interface] → pole: [manufacturer + model + ordered length], with collapsed length: [value], lock/sections: [type + count], and replacement path: [documented part/support or UNKNOWN].
Now give that line one result:
- DIRECT_SYSTEM_MATCH — the manufacturer documents the exact head, pole-end system and ordered variant as one connection path; length and ownership fields are also closed.
- TIP_MATCH_DOCUMENTED — the exact tip features and tool interface are documented, but the record should not be widened into a universal or cross-brand claim.
- ADAPTER_REQUIRED — both sides of a named adapter are documented and its exact part number belongs in the cart.
- HOLD_EXACT_VARIANT — a model, interface, dimension, replacement instruction or conflict is still open.
Do not replace the last result with “probably fits.” Ask the manufacturer or supplier one question that contains the exact head, tip or adapter and pole item numbers. A useful answer can be pasted directly into the record. A vague answer leaves the cart on hold—which is cheaper than discovering after delivery that the longest component cannot retain the tool you bought it to carry.